Taking Screenshots (Mac)
Stop taking photos of your screen. Your macOS computer has a built-in tool to make nice-looking screenshots a breeze
Screenshots are an handy way to capture exactly what you see on your screen. Whether you want to save an image, document an error, or share something interesting, macOS provides multiple methods to take screenshots. The built-in screenshot tool, an app called Screenshot.app, is great for taking a screenshot of either your entire screen or just a section. Below we'll explain how to take a screenshot, and how to find that screenshot on your computer.
Goals
- Be able to take a screenshot of your full screen or just a section
- Adjust where the screenshots are stored
Just the Highlights
- Use ⌘+Shift+3 to take a screenshot of the full screen
- Use ⌘+Shift+4 to select a portion of the screen
- Click the preview that pops up in the corner to edit the screenshot
- Use ⌘+Shift+5 to open the Screenshot.app and customize settings, including where screenshot files are stored.
- Screenshot.app can also be used to take a recording (video) of your screen
Taking a Screenshot
There are two quick ways to take screenshots on a Mac:
- Opening Screenshot.app (using Spotlight)
- Using ⌘+Shift+ a number for the screenshot you want to take.
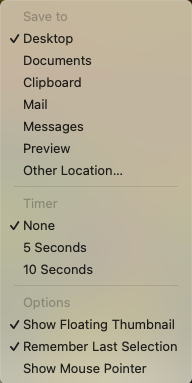
⌘+Shift+5 is the keyboard shortcut to quickly open Screenshot.app. You can also open the program with Spotlight by searching for it there. When you open it, a bar of options appears on your screen (image below). If you mouse-over the icons in the first section, you'll see that they represent: Capture entire screen, capture selected window, capture selected area. The second section has options to create a video or screen recording of either the full screen or the selected area. Finally you have the Options menu.


In the options menu, you can choose where you want the screenshots to be saved. By default, they're saved to the Desktop. If you want, you can create a new folder and select it by choosing Other Location... and finding it there. The other options include a timer, allowing you time between when you start the screenshot and when it is actually taken. You can also choose whether you want the mouse pointer to appear in the screenshot.
Instead of opening Screenshot.app, I almost always use ⌘+Shift+4, because it gives me the option to select the portion of the screen that I want in the screenshot. Once you press those keys, your cursor turns into a ➕ that you click and drag over the part of the screen you want captured.
⌘+Shift+3 immediately takes an image of your full screen. If you have multiple monitors, it will take a screenshot of each monitor and save them as separate files.
Editing Screenshots
If you have the option to "Show Floating Thumbnail" selected, a small image of your screenshot will show up in the bottom right of your screen after the screenshot is taken. You can click that thumbnail to open up an editor. In the top right of the editor window, you can choose to delete or share the screenshot, or click the little pen-in-a-circle icon to open a bunch of quick editing tools, including adding circles, arrows, or text to highlight what you want to show.

Screen recordings
Sometimes a simple screenshot isn't enough. The Screenshot.app tool also allows you to make a screen recording either of your whole screen or of a section.
- Open Screenshot.app either with Spotlight or +Shift+5
- Choose the screen recording option (in the middle of the options bar) you want to use
- If you chose to record the selected portion of your screen, position the screen recording window where and to the size you want it
- Click Record
- Do whatever you want to record
- When you are done, click the stop button (⬛) that appears in the toolbar at the top of your screen
- Your screen recording is automatically saved to the same place your screenshots go
Conclusion
Taking screenshots in macOS is a straightforward process with multiple methods available to suit your needs. Whether you're capturing the entire screen, a specific window, or a selected area, macOS has a tool for you. Remember that screenshots are automatically saved in the Desktop directory, making them easy to find and organize.
Experiment with these methods to see which one works best for you, and happy screenshotting!